
Showing posts with label Battle Reports. Show all posts

Sunday, August 5, 2018

Rogue Star Wars: Bothawui Run

Bothawui, where rebels yell.
Planet Bothawui, where it gets cold only sometimes.
After the close call with the pirates, the Rebel station at the Bothawui polar region was to be evacuated.  They knew it was only a matter of time before the Imperials figured out what was going on and came out to investigate, so the teams quickly moved to evade any so-called 'entanglements'.  After procuring most of the sensitive equipment and data, only a few sections of the base remained to be dismantled.

Reeling from casualties sustained in the earlier skirmish, the band of rebels attempts to upload a cache of sensitive deployment data to courier ships waiting in orbit.  Already on the way, unbeknownst to the rebels, was a team of Imperial Stormtroopers led there by an independent contractor, an outer rim bounty hunter.  We open as both teams close in on the transmitter...

All the rebels have to do is establish the uplink and complete the transfer.  The Imperials are inspecting the ruins, and are soon alerted to their presence.  It's a simple thing, to complete the transfer...nought but a few keystrokes.

BATTLE REPORT
Rogue Stars by Osprey Publishing

Rogue Star Wars Campaign 
Bothawui Rebel Attack on Imperials; Hacking Mission

Setup
Rebel Tech-Partisans vs Imperial Hunter-Killer Team

No complications were used for this match, despite what we were explicitly told to do.  We simply forgot.


Quickly and quietly, the Rebel team begins its advance back into the ruins...only vaguely aware of the precariousness of the situation.  Imperials weren't immediately expected, but little did they know that a mysterious bounty hunter had tailed the Buru brothers right to the ancient Jedi ruins.  By the time the Rebels had returned from the first phase of the evacuation, the contractor had returned with an Imperial patrol and were already sniffing around the site.

Bothawui Run 1
Let's just wait here and see if anyone shoots at them.
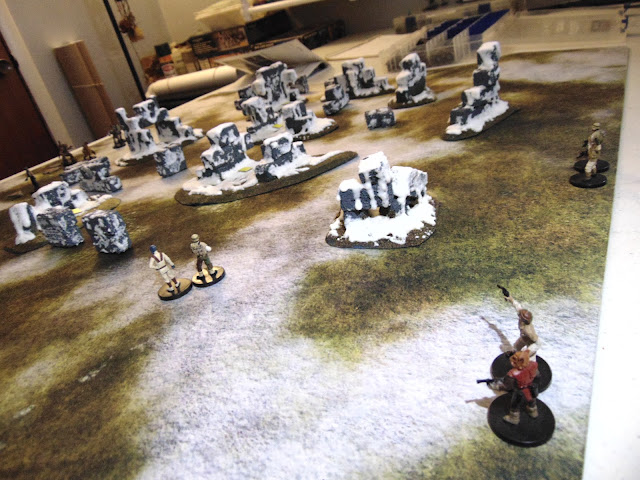
Imperials had the first activations, but were taking their time walking across the treacherous snow and avoiding those TN 8 Terrain rolls.  The Rebel Pathfinder and Bothan Commando took the first reactions to run as fast as they could toward the objective.  For a while, there were no targets in sight for either team.

Bothawui Run 2
This looks like a good spot to wait for someone to shoot.
It takes multiple actions to get anywhere.   At 2" each, you have to spend all 3 from 3 successful dice to get a 6" move.  It's kinda funny that it's more stressful to walk than run, but then I remembered they were walking in ankle deep snow slush over muddy ground.  Still, it's worth indicating that you should probably only walk where it's injurious to do otherwise.

After all, you could be shot.

Bothawui Run 3
Just take baby steps and you'll be ok.
The stormtroopers moved to cover the center area of the board, as if they could feel the rebel presence long before they could see it.  Scan-darts should be a thing...but it didn't matter anyway.  The Imperials had Heavy Firepower, and knew how to use it - concentrated on one area.

Bothawui Run 4
Remember to cover your squadmates during leap-frog advances.  It's just plain rude not to.
The Rebels made it to the edge of the ruin where the uplink was concealed within the Jedi Temple's architecture.  The advance stalled there when they tried to move more elements up to repel the Imperial fire that was about to pour on the comm-station.  However, the Rebel team was at a pretty strong disadvantage for one reason:  the Rogue Stars campaign system for survival is quite brutal, and the Rebel team was already down two members to four at the outset of the game.

Bothawui Run 5
That's not reinforcements but ok...
Get to the comm-link, spend two actions and make a roll of 15+ on a d20.  That's all they had to do.  Things were going pretty good for the first few rounds of the game...

Bothawui Run 6
Hey, let me just plug in this data-spike and we'll begin the upload...
However, the Imperials were already in key positions overlooking the transmitter.  They must have detected the encrypted signals coming from the transponders hidden in the ancient rock spires.  It was mere seconds before the Imperials sighted movement and began their attack.

Bothawui Run 7
PLA-KET-KETT!
Fire was exchanged in all directions, and second rank guns moved up to take the place of those that went down.

Bothawui Run 8
Dammit, Jenkins...get in that hole and press the button!
After a few harsh rounds of fire using several Imperial Heavy Firepower tokens, two rebels were out of action and a single stormtrooper was stunned.  The Rebel Commando finally got to the scene and immediately began First Aid, owing to how brutal the campaign system is on fighters that go out of action.  Mainly, you're dead most of the time even if you're somehow stabilized.

Bothawui Run 9
Uhh...it's not working, sir?  I think it's because Jenkins is dead.
The Imperials poured on the fire, using the Heavy Firepower discipline until it was gone.  Once the Rebel Pathfinder went down, it was clear this was going to be an uphill climb for the Rebel team.  Still, they pressed forward, determined to get the last datastore uploaded and away from their enemies.

Bothawui Run 10
Anyone that runs is a Rebel soldier.  Anyone who doesn't run is a well-disciplined Rebel soldier.
The last remaining rebels dove for cover but it was no use.  They'd have to take more of the guns out of play.  After weathering the Heavy Firepower, they were already out of position and undermanned, but if they couldn't take out more troopers quickly they'd have to roll the dice on the upload.  The last remaining rebel, the commander, moved up to work the uplink and finish the mission, despite almost 100% casualties.

Bothawui Run 11
Who needs maneuver when you've got firepower and armor?
The commander managed a return shot before he was knocked prone.  Several shots from the Imperial fireteam melted the snow where he was lying before he could get the uplink finished as they raked the area with their guns.  They piled on a huge amount of pin tokens during their frantic deluge of blaster fire, as well as 3 wounds.  However, he was successful and punched the code...only to fail to get the thing to truly upload.  With that...the game was over.  The Rebel Commander retreated, leaving the fallen where they were.

Bothawui Run 12
We found a large number of pin tokens and a few wounds among the survivors, sir.
The Imperial team calmly reloaded their weapons after running out of ammunition and resumed firing into the structure.  The structure funneled the rebels right into their fire solution.  They didn't advance until there was no more movement on scanners, and then began searching the ruins for evidence of rebel activity, capturing all of the Rebel team except the captain.

Sunday, July 15, 2018

Rogue Star Wars: Jedi Temple Heist

Bothawui, where rebels yell.
Planet Bothawui, remote polar region.
Buru Brothers Shipping & Handling, Inc. arrived on Bothawui with somewhat noble intentions.  Based in the infamous Cloak of the Sith, on a planet called Roon, Urdaaghr Buru and his family have skirted Imperial law their entire lives.  With the outbreak of the Galactic Civil War, the company has been having frequent meetings with the rebel Spynet.  However, negotiations have gone sour.

It seems the Spynet thinks that the Buru Brothers OWE them something...duty or what-not.  The whole thing ended with everyone walking away, but Urdaaghr was more than miffed.  They had braved the Imperial patrols and come all this way, for what?  Not to be pretty much slapped in the face!

Unfortunately for the rebels, the murderous aqualish knows a little bit more than they'd like about their operations on Bothawui.  At a remote ruin that is supposedly an "ancient Jedi temple" is an Alliance safehouse, lightly guarded.  Supposedly, weapons and other trade goods are stockpiled there, ripe for the taking.  And so, Buru Brothers Shipping & Handling, Inc. got right to work doing what they do best...stealing.

BATTLE REPORT
Rogue Stars by Osprey Publishing

Rogue Star Wars Campaign 
Bothawui Scum Attack on Rebels; Steal Valuables Mission

Setup
Buru Brothers Shipping & Handling vs Rebel Tech-Partisans

Complication: I thought you had it!
Both players lose 1 piece of equipment chosen by the opponent.  I took this to mean Equipment exclusively, that is, Equipment bought from the Equipment list.  The Rebels lost their medikit, and the Scum had no equipment to take!


For the Steal Valuables mission, we needed to make use of six tokens.  The book called for three "Yes" and three "No" tokens, but I didn't have anything readily on hand to use.  I had a sheet of cardboard chits though, and figured it's a good a time as any to use them.

I have no idea where that sheet of chits came from or where I got them, but one side was yellow and one side was white.  Instead of marking them "Yes" and "No", I simply wrote "!" and "?" on them.  Might as well get some mileage out of them.  I'm sure we can use them for plenty of games.

Making Tokens
Blank Token Sheet.  No idea where it came from.
https://blogger.googleusercontent.com/img/b/R29vZ2xl/AVvXsEg3f6JI6nPYX-dCXgsdHX1c1gvaUGVZUi1WIdQV5E41SU_IcL2jOI0C3RgeDpFRHNicbmDEyMgzTLPQFUtjq24QqnRibqwAj9HclnFrRc4A0RREn19KuephNyqxZ70fVGPYt0OhaeMO_1Zs/s1600/Rogue+Star+Wars+2+-+New+Tokens.JPG
De-blanked tokens, white face.

Once the tokens were made, they were placed on the field.  We realized that with mission parameters this pretty much pushed everyone to the edges without any other rules.  Scum gained the initiative, and began to advance.

Rogue Stars and Star Wars Miniatures - Setup
Scum have a rough start, immediately slipping and falling.  Other people just stood there like morons.
Unfortunately, the snow made things rough.  A TN 8 terrain check may not sound like much...but with everyone running everywhere it quickly became apparent that it was going to be a problem.  A lot of stress and not much ground was covered as warriors immediately slipped and had to spend an action getting up.
Rogue Stars and Star Wars Miniatures - Rebel Advance
Let's go out here where there isn't any cover and play in the muddy snow.
The Rebels have it slightly easier, but manage to get caught in the snow in the open.  The melting snow and muddy grass is hard to run in...not solid at all.  The Rebel Pathfinder will have an easier time with his Agile trait.

Rogue Stars and Star Wars Miniatures - Steal the Initiative
Moving in the snow is difficult and hazardous.  Get more done with solid Reactions.
The Scum had activated all six of their models before it was realized that the initiative could be stolen before that.  Six or more Stress markers on the enemy team and you've got a good chance.  At the point, the game quickly picked up in pace as the initiative began to get stolen back and forth at breakneck speeds.

Also there were a lot of reactions.  Like...a LOT.  That's part of the game, and even if you don't have the initiative you can get a lot done.  Look at the picture of the board above at the end of what you might consider the first "turn".  The Rebels reacted more than the Scum acted.  Get used to it...this is why the Rebels didn't realize they could steal the initiative earlier.

Rebel Commando and Duros Technician Advance
"There's one over there...and over there...and over there!"
The Rebel advance team consisting of a commando and the medic arrive in cover as they move toward the objectives.  As the Rebel team creeps forward, the Scum start to use their reactions to get further into the map, and steal the initiative back quickly.  It's not long before they make an egress into the central area of the ruins.

Whiphid Tracker is obviously drunk.
Except Whiphid Tracker.  Whiphid Tracker doesn't care what your problem is.
The Scum manage to retain the initiative most of the time, despite not being able to accomplish much other than ratting about in the snow.

Aqualish Spy is Stressed.
Everyone is alarmed, even though the enemy has not yet been encountered.
The Duros Scoundrel actually takes the first shot, nailing the Rebel Commando that advanced earlier.  It knocks him prone, and the Rebels use reactions to move him back into cover for the Duros Technician to use First Aid...even though he doesn't have a medikit.  The Commando is Stunned, which puts him in danger of going Out-of-Action anytime he attempts anything.  First Aid can fix this condition, so they huddle behind the stones as the scum continue their advance.

The Scum advance on the Rebel positions.
Make 'em keep their heads down...
The Aqualish Spy and Duros Scoundrel on the Scum side pin down the Duros Technician and Rebel Commando as the rest of the team advances on the East flank.

Boss Buru always gets his goods.
I like to steal things before my boss gets here.
On that side of the table, the Aqualish Technician (Buru) and his brother (Aqualish Assassin) move toward the objectives.  The Kel Dor Bounty Hunter working for the Buru Brothers moves to grab an objective.

Rebel Commando down!
Want me to show you a trick to take your mind off that pain?
First Aid was performed on the downed Rebel Commando, who was not yet out of action.  He remained pinned though...actions were precious and weren't allotted to his recovery.  This kept him down and wounded behind that rock for most of the game.

Rebels Approach the Objectives...
Folks are having a hard time in the snow.
At least until the Scum moved up and finished the job.  The Commando raced out into the open with his rifle, hoping to stave off the Scum from reaching the objective.  Brave, but foolish...he was rewarded with another laser blast.

Rebel Commandos and Laser Rifles
What accuracy with that laser rifle!
The Bothan Commando finally reached the center area after a long struggle across the snow.  From that position, he was able to use a reaction to take the Whiphid Tracker out of action with a single shot.  The Rebels stole the initiative soon after and the Bothan was able to take out the Duros Scoundrel with another well-placed shot!

Rogue Star Wars Steal Valuables Objectives.
Agility and Speed really paid off here.
Soon, more actions were floating toward the Rebels, unlike in the early game.  The lead the Scum had was soon squandered after every objective they reached was fake.  The Rebel Pathfinder with the Speed and Agility traits really shined in the late game as he was able to move faster and with smaller chance for error.

Kel Dor Bounty Hunter on Objective
Here's looking at you, bothan kid.
Soon after this, the Rebels had most of the objectives locked down.  The 'real' objectives.  The Rebel Commander found one at the beginning of the game and simply stayed there in case his rifle was needed.  The sheer clownery of the Scum kept them from securing the further objectives...bad luck for the Buru Brothers.

Rogue Star Wars Rebel Victory
Every objective you touch shall turn to "?".
In the end, the Rebels carried the day after the Scum decided to retreat after losing half their team.  With the number of objectives in Rebel hands, it was best to call it a day.  According to the Objectives section of the mission, both teams score 6xp each.  It is pretty much a draw, but the Rebels get to keep the gear they were stashing here.  Alarmed that their cache is compromised, they begin moving it to a more secure location.